When someone hears about creating an eCommerce website, many think it’s rocket science. Some even believe it requires technical expertise.
If you also feel the same, relax, it’s not.
Anyone, barely with little to no technical knowledge can set up an online store on WordPress. To do that, all you need is a guide like ours that covers every necessary step with visuals.
We will show how to build an eCommerce website with WordPress with eight easy to follow steps.
Let’s kick off your eCommerce journey together!
TL;DR
- Choose a domain name and reliable web hosting with SSL.
- Use your hosting provider’s one-click installer to get WordPress up and running.
- Install an active WooCommerce plugin, and run the setup wizard.
- Pick a fast, responsive, and WooCommerce-compatible theme.
- Add products (types, images, categories, variations).
- Configure payments, shipping zones/rates, and taxes.
- Install essential plugins like Discountify, MemberHub and FilterPlus.
Step 1: Set Up WordPress Site (If You Haven’t Already)
Skip this step and start from Step 2, if you already have a running WordPress site.
But if you don’t have one, then here are certain things that you need to do before turn your site into an online store:
- Choose Domain Name: Domain is your store’s address. Just as you type “YouTube.com” to reach YouTube, customers will type your chosen name to reach you. And you can buy one from any trusted registrar like Namecheap.
- Get Web Hosting: Don’t need to guess, take a look at hosting choosing guide from WooCommerce. They recommend hosting providers like Pressable, Hostinger, SiteGround, or Bluehost.
- Install WordPress: Almost all the hosting providers offer one-click WordPress installation. Log in to your hosting, Install WordPress from there. (Check out this video detailed guide) During WP installation, enable the SSL certificate (usually included with hosting).
- Configure WordPress Settings: Once installation is done, log in and go to WordPress dashboard > Settings to make some basic changes like:
- General: Set your site title, tagline, site icon, URLs, timezone, and date formats.
- Permalinks: Choose a URL structure or create a custom one.
- Create Necessary Pages: Add essential pages like Home, Contact, and a Blog by going to WordPress dashboard > Pages > Add New. (WooCommerce will automatically create key store related pages like Cart, Checkout, and My Account)
Step 2: Install and Configure WooCommerce Plugin
To create an eCommerce store with WordPress, you will need the WooCommerce plugin. It will add all the necessary eCommerce features and functionality to your site.
It’s a free plugin that you can get by going to Plugins > Add Plugin from your WordPress dashboard and search for WooCommerce to install and activate it.
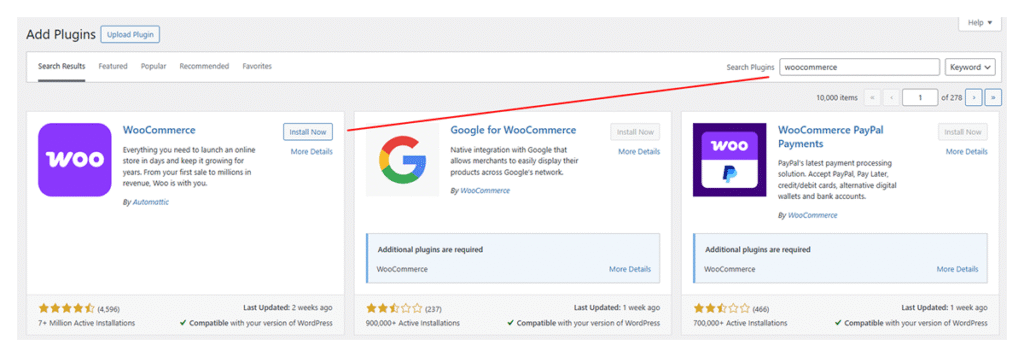
After you activate the plugin, it will redirect you to the WooCommerce setup wizard. You can either skip it or click “Set up my store” to begin the following configuration:

Choose Your Role
Pick the option that best describes you. You can select whether you are starting a business, running an existing store, or building for a client.

Add Store Details
Next, enter your business address, product type, email and more.

Plugin Recommendations
At the end of the setup guide, you will see suggestions for additional plugins. You can install them right away or uncheck the boxes to skip the installation. (WooCommerce suggests these plugins to cover essential features your store might need.)
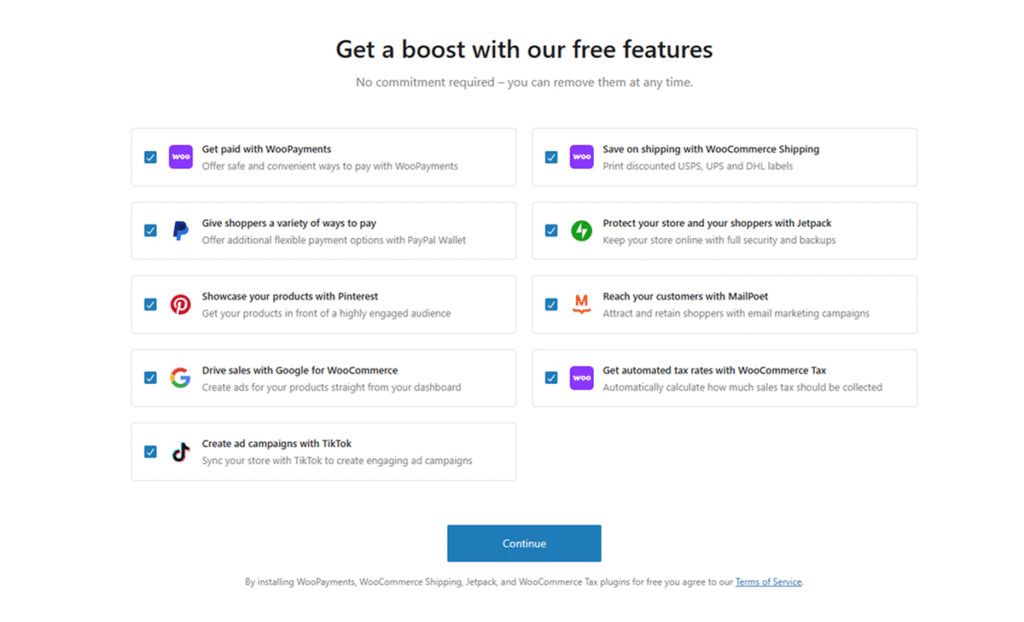
Once you complete the setup, it will take you to your WooCommerce dashboard, where you can add products and customize your store.
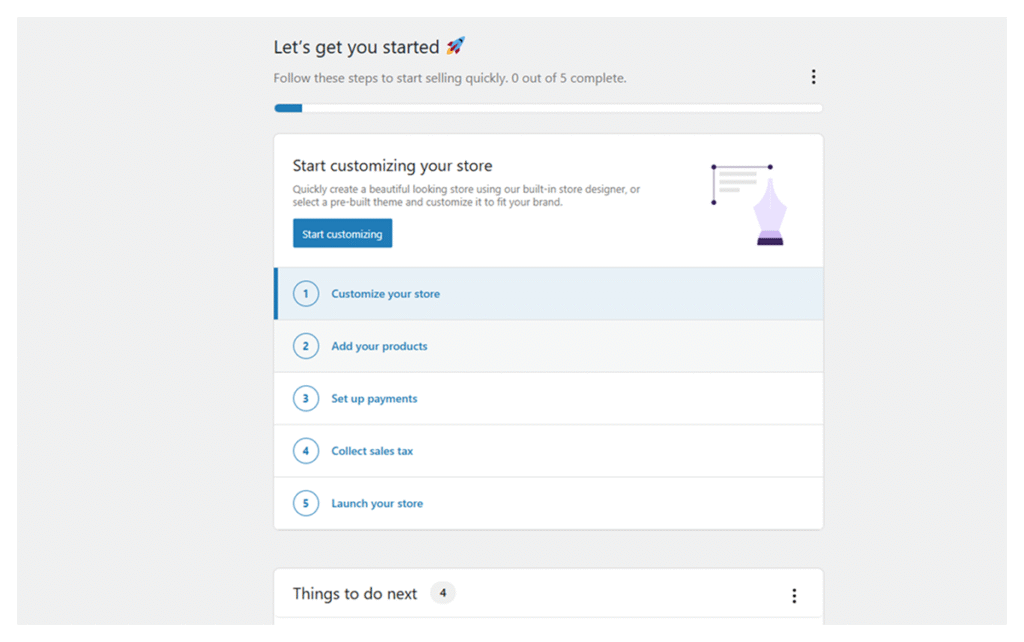
We are going to skip adding products or customization for now and focus on other essential store settings first.
Step 3: Choose a WooCommerce Theme
Select a WooCommerce-compatible WordPress theme that fits your store’s style. You can use themes like Storefront, Astra, or Divi as all of them offer better customization options. (You can stick with the default, but WooCommerce themes bring more control over design and shopping experience.)
If you are using a free theme:
- Go to Appearance > Themes > Add New from your WordPress dashboard.
- Search for your chosen theme, then click Install and Activate.
If you are using a premium theme:
- Download the theme’s .zip file from the developer’s website.
- Go to Appearance > Themes > Add New and click the Upload Theme button.
- Select the .zip file from your computer to install and activate it.
Upon activation of your theme, your store will immediately adopt its design and layout. Don’t worry if it looks plain at first, we will cover customization in Step 6.
Step 4: Add Your Products or Services for Sale
One of the great things about WooCommerce is its flexibility to sell anything like physical, digital, or services. Here we are going to show you how to add them step by step:
4.1: Navigate to Add a New Product
From your WordPress dashboard, go to Products > Add New Product.

4.2: Enter Basic Product Information
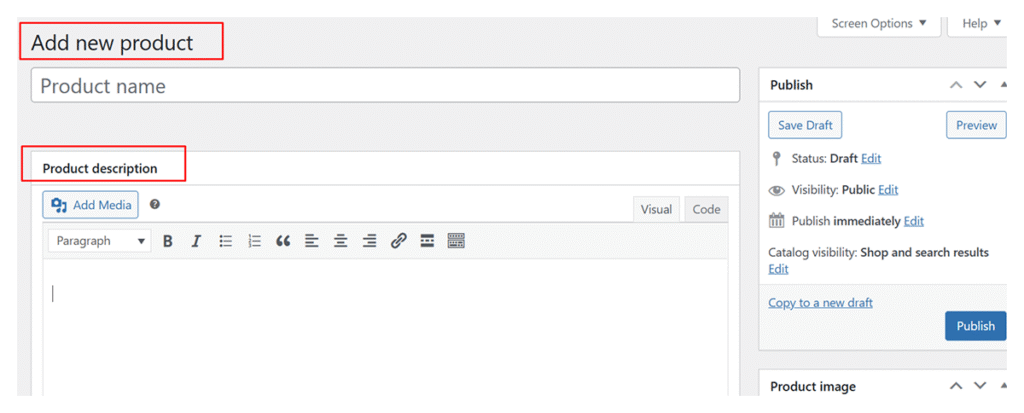
Start with adding your product /service name and description in the title and description fields. You can use the description area to highlight product features, benefits, and more, with images, bullet points, or even videos.
4.3: Configure Product or Service Data
This is the control center for your product, where you decide its type, pricing, inventory, and selling rules. We will walk through each option so you can set them up with ease:
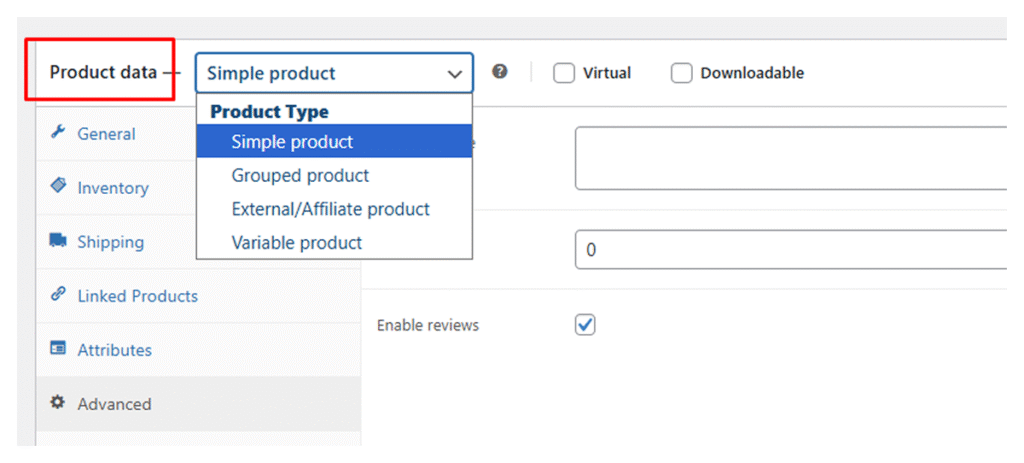
Choose Product Type
From the “Product Data” dropdown, you will choose the product type that best matches what you are selling. You can choose from the following options:
- Simple Product: It’s best for selling a single product without variations like size or color. However, if you are selling a service, select Virtual, and if it’s a digital file, select Downloadable.
- Grouped Product: Use this to list related products together so your customers can view and buy them in one place individually. It can be useful for bundles, like a set of candles.
- External/Affiliate Product: Choose this if your product is sold somewhere else. Instead of adding it to the cart, customers will click “Buy” and go straight to that site. It’s perfect for affiliate links or external store listings.
- Variable Product: Use this when one product comes in different versions, like a T-shirt with sizes or colors. Each option can have its own price, stock, and picture.
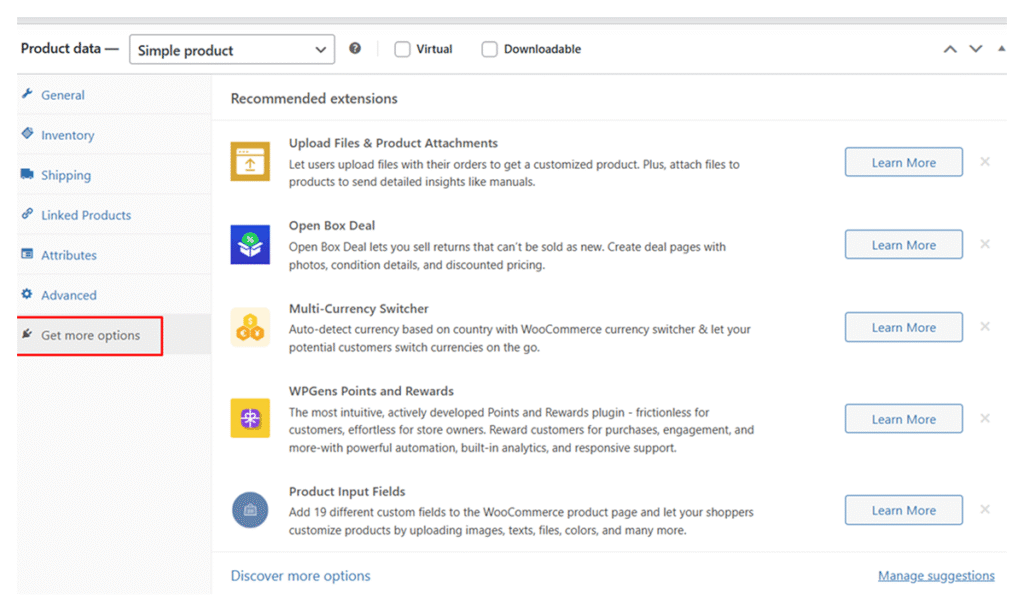
Based on your selected product type, you will see a set of tabs on the left side of the Product Data section. These include:
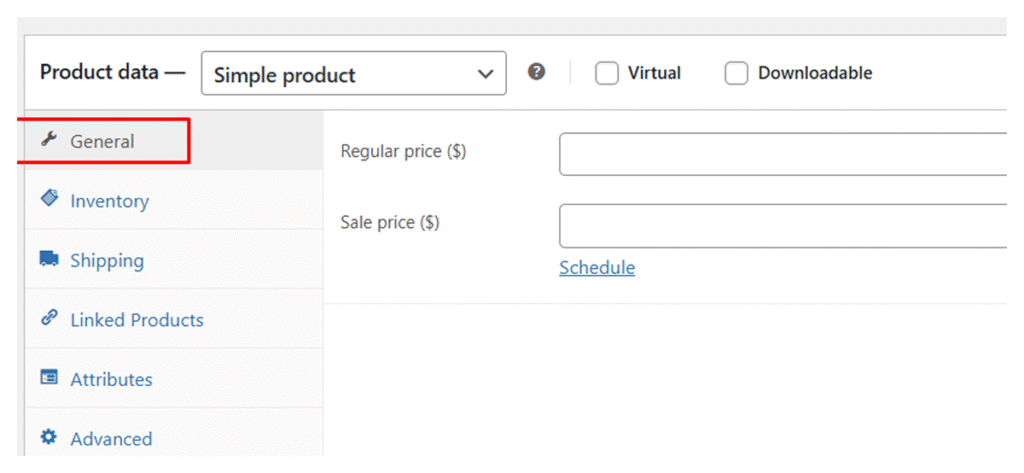
- General: Set a regular and sale price (discount). You can schedule the sale price using the “Schedule” option. And if you mark the product as Downloadable, you can also upload files, set download limits, and expiry dates.
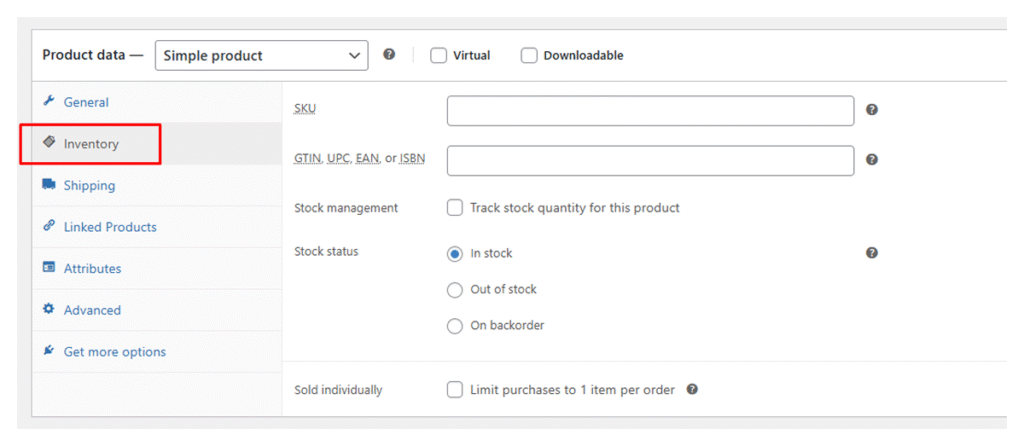
- Inventory: Here you can add a product code (SKU), track stock, mark items as in stock, out of stock, or on backorder, and even limit how many a customer can buy.
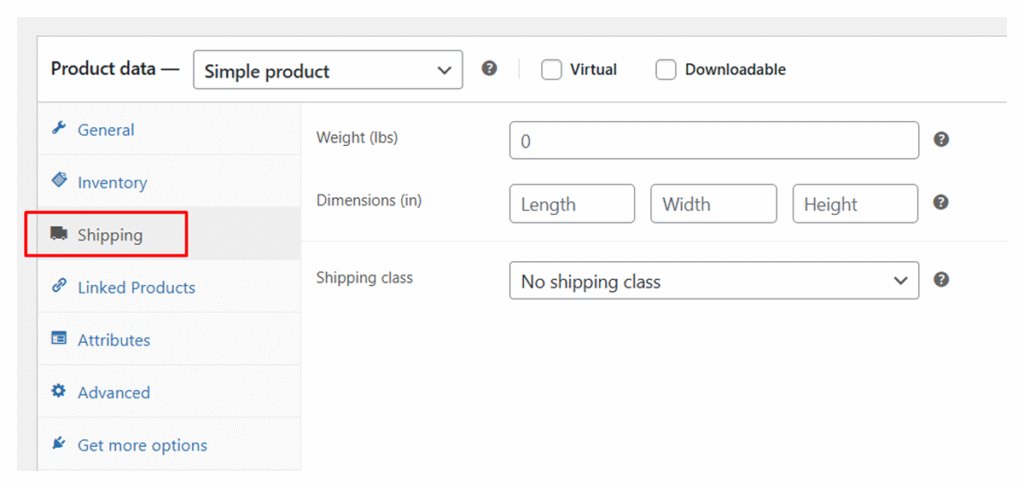
- Shipping: This tab lets you add product weight and dimensions to calculate shipping costs. You can also assign a shipping class if you want to group products with similar shipping rules.
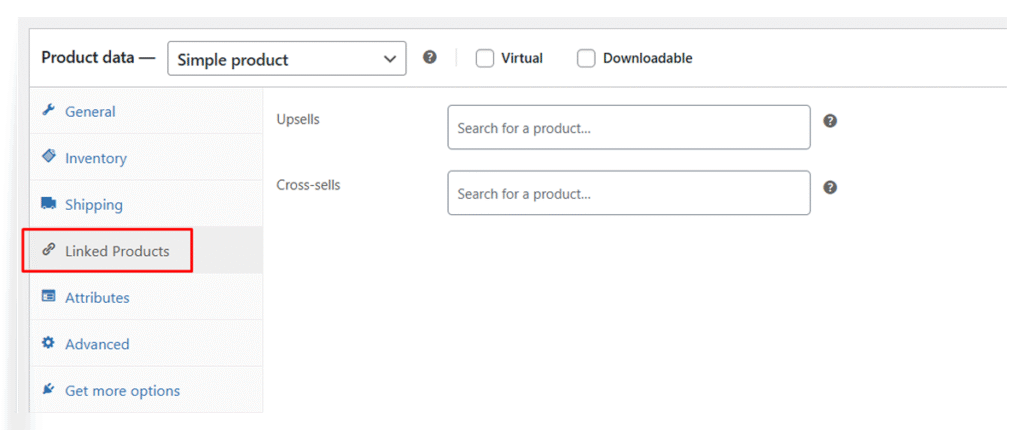
- Linked Products: This tab lets you add upsells (products you recommend instead of the current one) or cross-sells (products suggested in the cart to increase the order value).
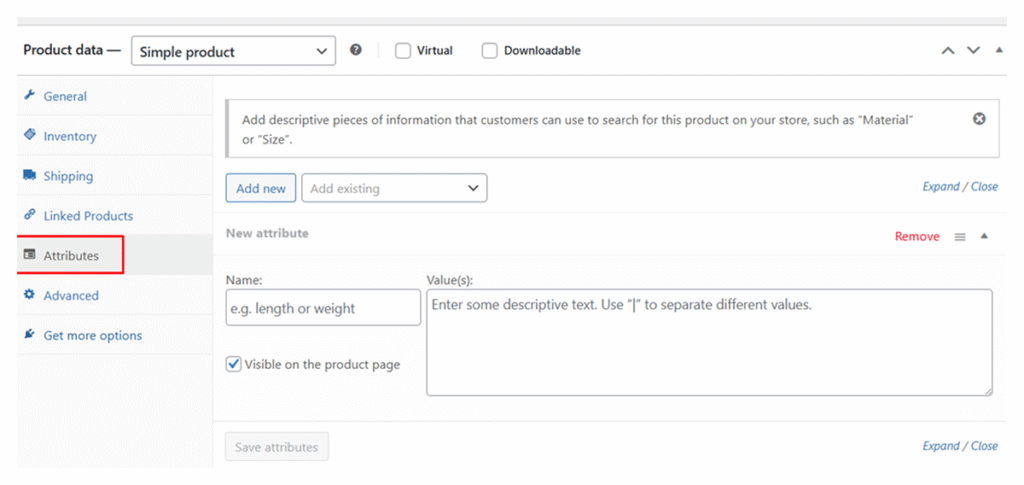
- Attributes: This section is for adding extra details to your products, like color, size, or material. You can either add new attributes for a single product or use existing global attributes created under Products > Attributes.
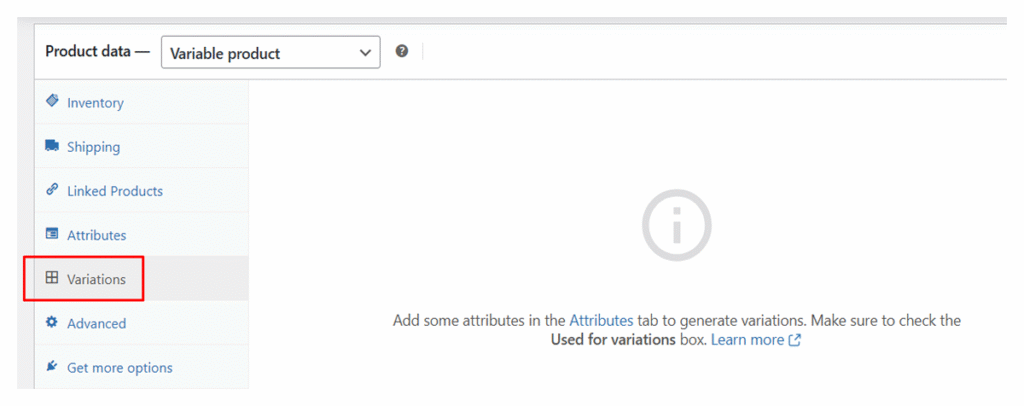
- Variations: This tab appears only for Variable Products. It lets you create different versions of a product based on attributes like size, color, or material. Each variation can have its own price, stock, image, and shipping details.
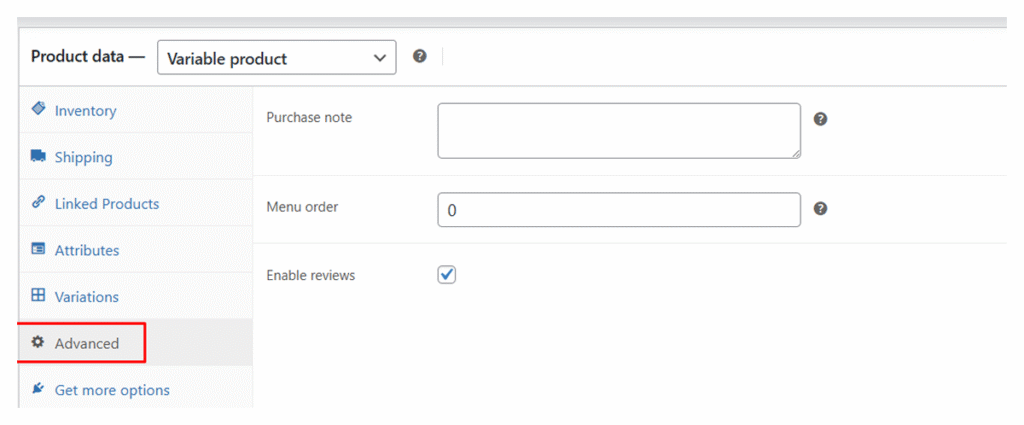
- Advanced: Here you can add a custom note for customers after they buy, change the menu order to control where the product appears, and enable or disable product reviews.
- Get more options: This tab suggests extra WooCommerce extensions you can install to add more features to your store, such as product add-ons, points and rewards.
Note: To learn more about each of these tabs and their specific settings, you can check out the WooCommerce documentation for products.
4.4: Add Product Short Description
Product short description is a brief summary that appears next to the main product image, usually above the Add to Cart button on the product page.

4.5: Upload Product Images
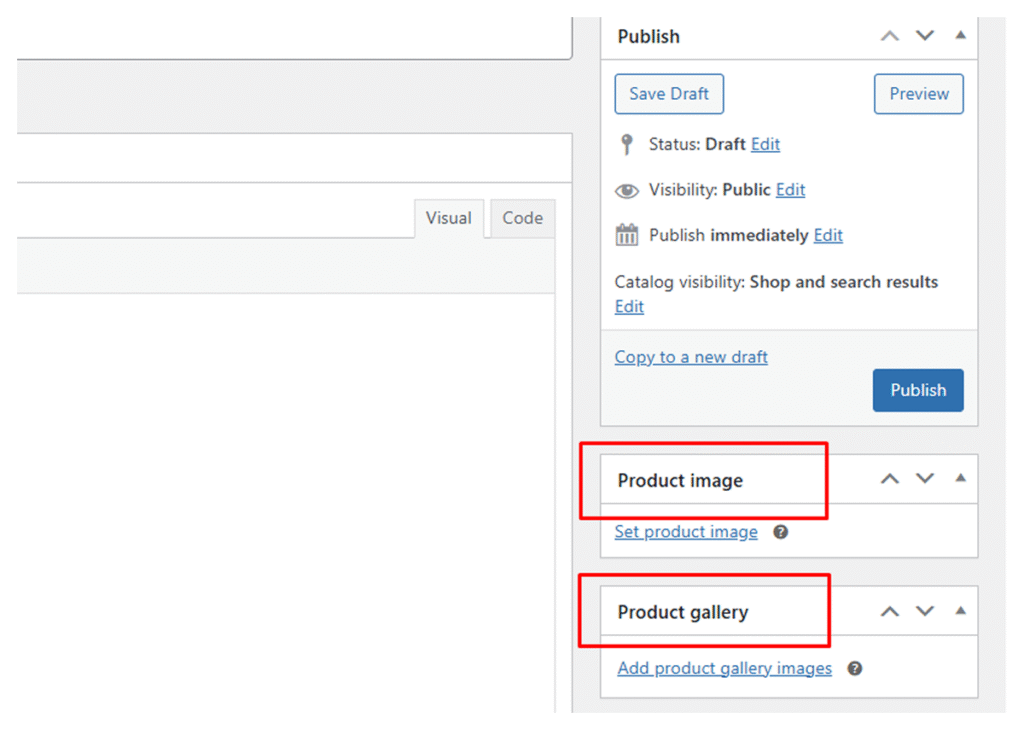
Add a main product image that will appear on your shop page and product page (this is the photo customers notice first.) With “Product Gallery”, you can add extra photos to show different angles or details, which will display as a gallery on the product page.
4.6: Organize Your Products
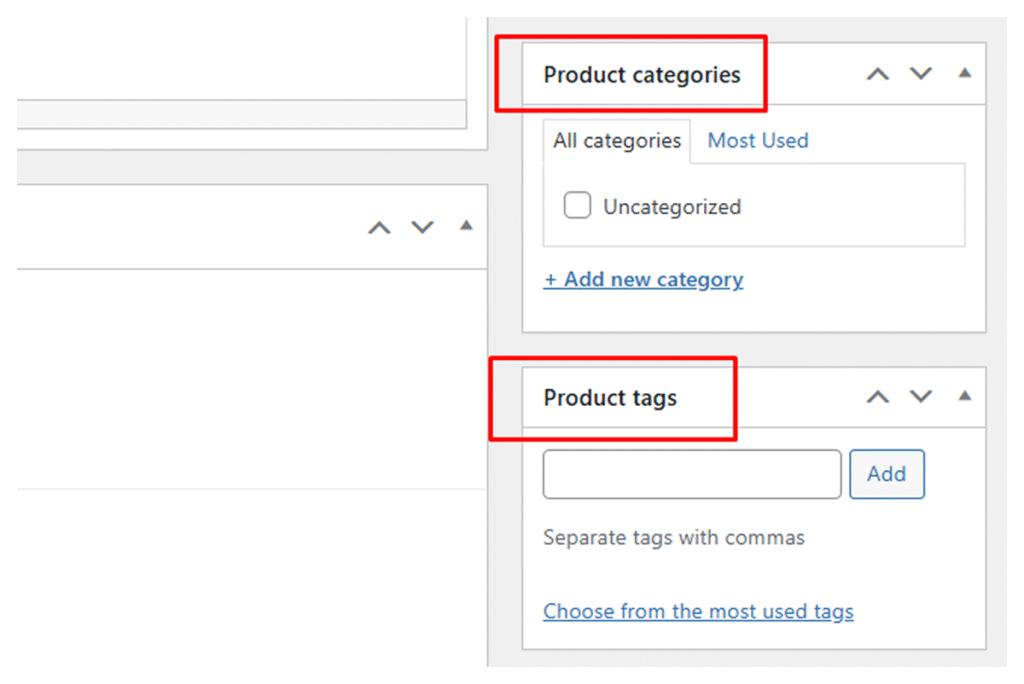
Use Product Categories to group similar items (like Clothing, Shoes, or Accessories). Then add Product Tags with keywords to make it easier for customers to find related products.
4.7: Publish the Product
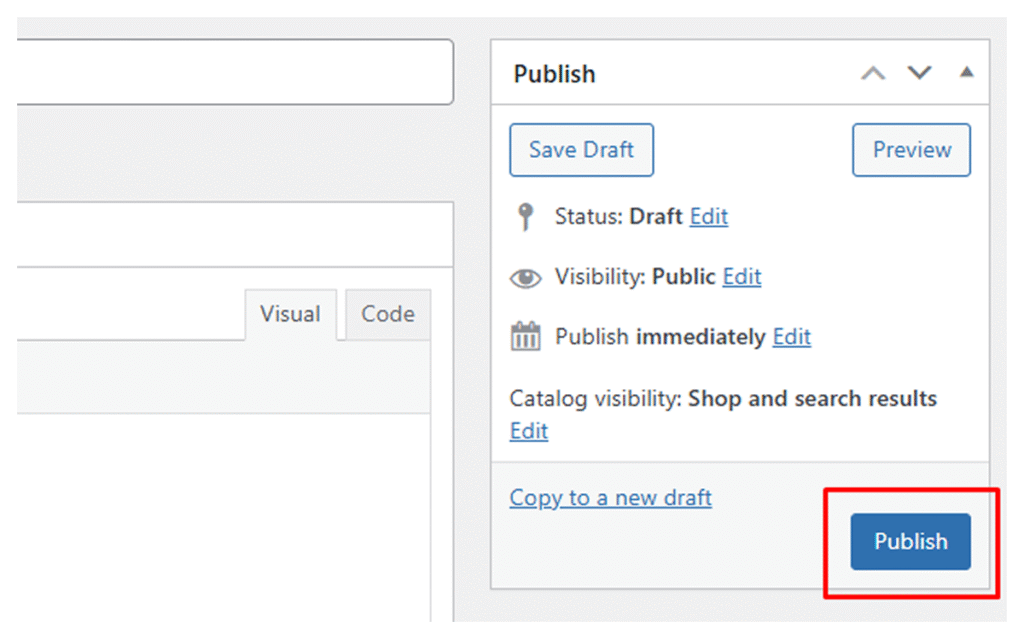
When you are happy with the setup, hit Publish to make your product go live and visible in your store.
Step 5: Configure Payments, Shipping, & Taxes
Now that your products are ready, the next step is to make sure customers can pay securely, get their orders delivered, and see the right taxes at checkout.
Configure Payment Methods
In your WordPress dashboard, go to WooCommerce > Settings > Payments. From here, you can turn on and set up the payment options you want to offer.
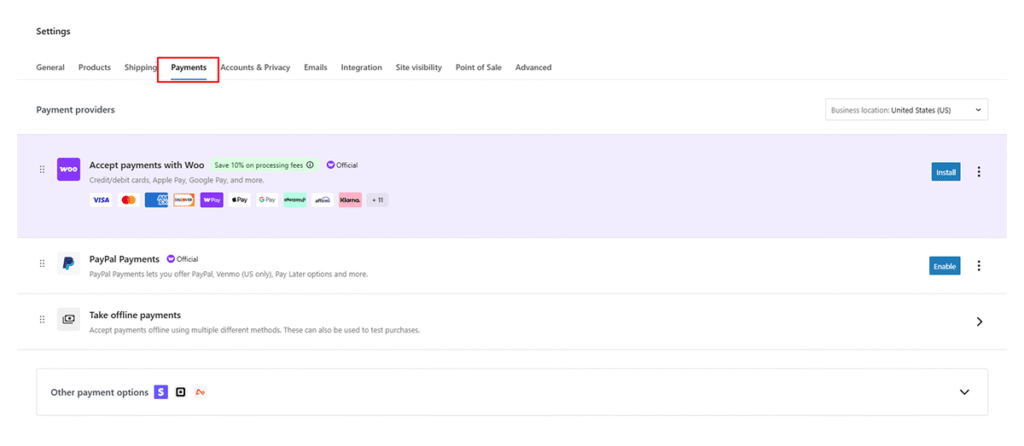
- WooPayments: The easiest option, letting you accept credit/debit cards, Apple Pay, Google Pay, and more directly from your store.
- PayPal Payments: Allows customers to pay with PayPal, Venmo (US only), or Pay Later.
- Offline Payments: Options like bank transfer, checks, or cash on delivery.
- Other Providers: You can also connect Stripe, Square, or region-specific gateways if needed.
Note: After turning on a payment method, click Set up to add details like your bank info, API keys, PayPal email and more.
Set Up Shipping Options
To set up shipping in WooCommerce, go to WooCommerce > Settings > Shipping. From here, you will create shipping zones, specific regions where you want to deliver products. Each zone can have its own shipping methods and rates.
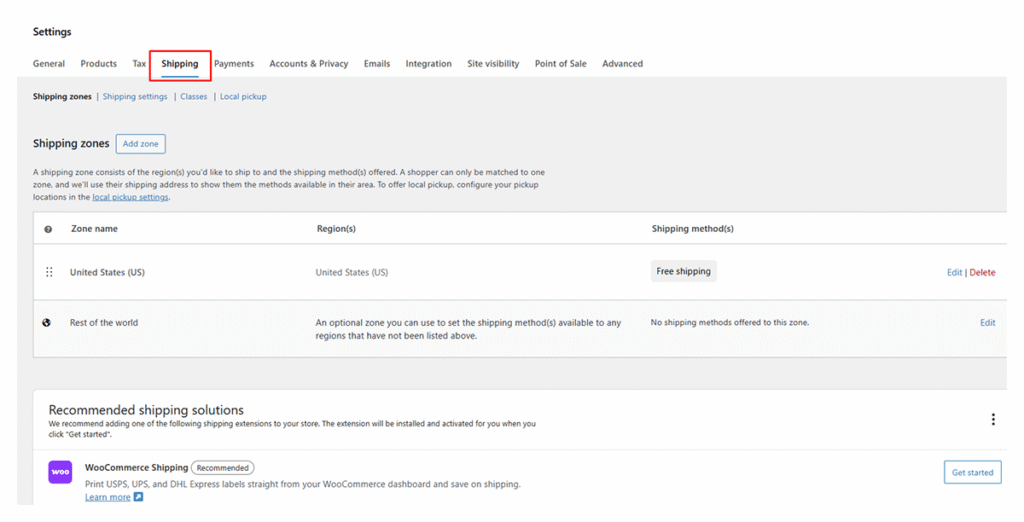
Here is what you can manage in the Shipping settings:
- Shipping Zones: Think of zones as delivery areas. You decide where you’ll ship and set different rules for each one. For example, you could offer a flat $5 fee for local deliveries and a higher rate for international orders.
- Shipping Methods: These are the ways customers receive their orders. WooCommerce includes Flat Rate, Free Shipping, and Local Pickup by default.
- Shipping Classes: Use these to group products with similar shipping needs. Heavy or oversized items can have their own class (with higher rates), while lightweight products can ship for less.
- Default Options: Control how shipping choices appear at checkout, and even pre-select one to make the process easier for customers.
If you want to save time, the WooCommerce Shipping extension can automate a lot of this for you. It lets you print labels directly and get discounted rates from carriers like USPS and DHL.
Configure Taxes
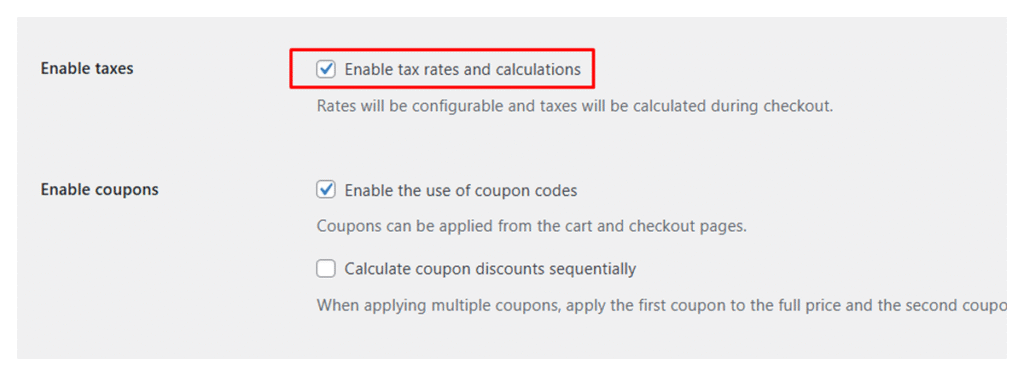
Head over to WooCommerce > Settings > General and tick the box for Enable taxes and tax calculations. Once you save, a new Tax tab will appear where you can set up how taxes work in your store.
In the Tax tab, you decide how taxes are handled in your store. Here is what you can manage:
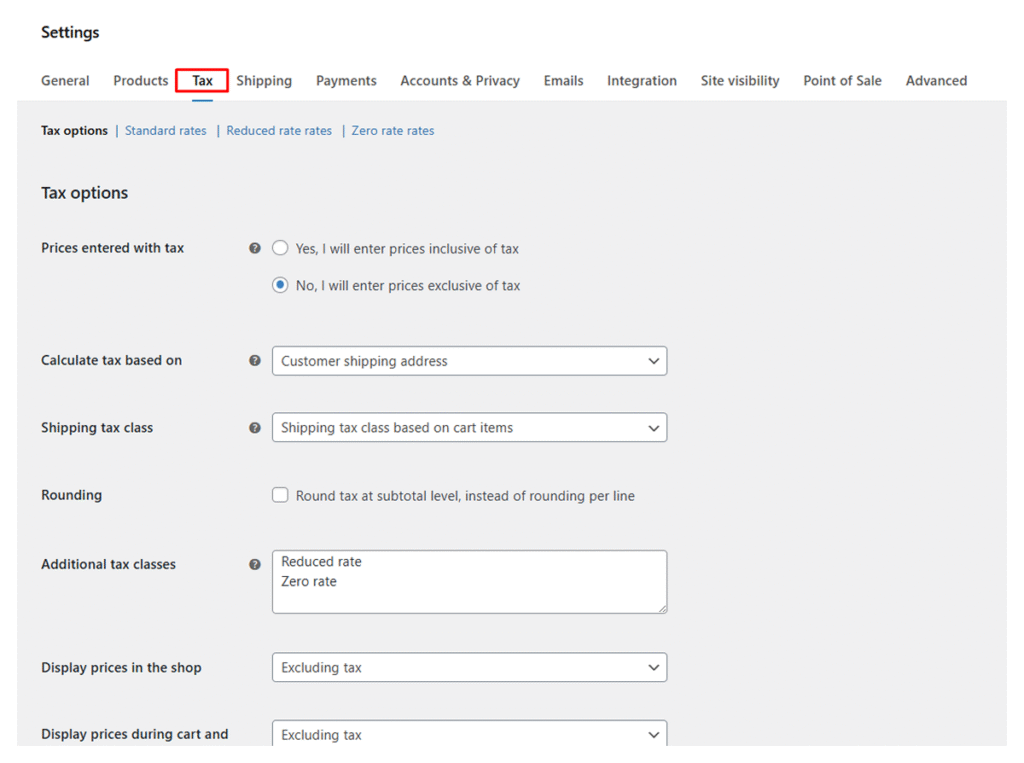
- Set whether product prices include or exclude tax.
- Choose how taxes are calculated (by the customer’s shipping address, billing address, or your store location.)
- Apply different tax classes such as standard, reduced, or zero rate.
- Control how prices appear on shop and checkout pages (with or without tax).
- Decide how totals and rounding are displayed.
You can add tax rates manually or use the WooCommerce Tax extension to calculate them automatically based on customer location.
Step 6: Customize Your Store
After handling the setup basics, the next step is giving your store the look and feel of your brand. Here is how you can do it:
Use the Theme Customizer
Go to Appearance > Customize from your WordPress dashboard. This will open the live customizer where you can tweak your store’s design and instantly preview the changes. Here are the main things to adjust:
- Upload your logo, change your site title and tagline.
- Adjust colors and fonts to match your brand.
- Customize your header, footer, and homepage layout.
Create & Organize Menus
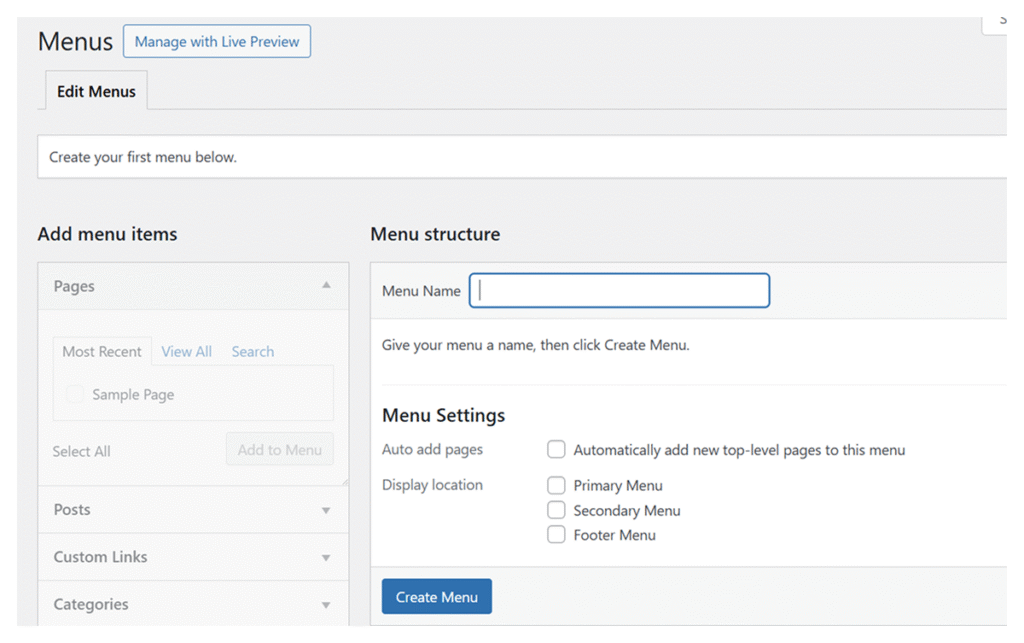
Go to Appearance > Menus to create navigation menu important pages like Shop, Categories, Cart, Checkout, and Contact. Add dropdowns if you have multiple product categories, so that shoppers can find what they need quickly.
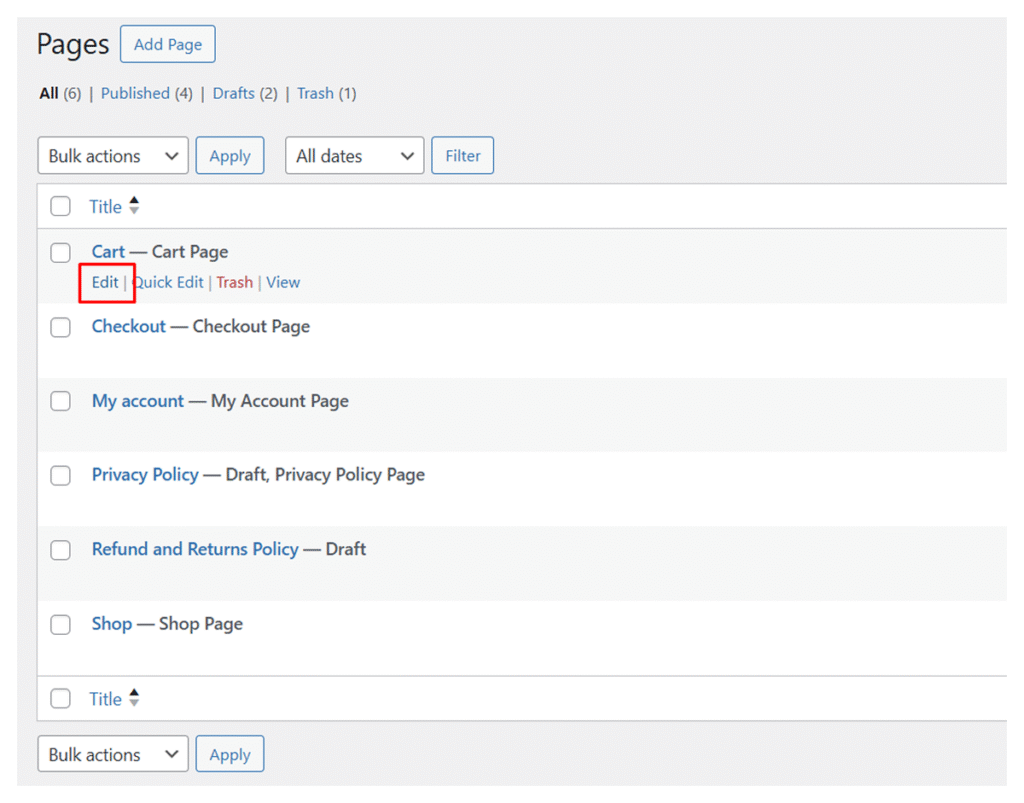
Customize WooCommerce Pages
WooCommerce creates pages like Shop, Cart, Checkout, and My Account by default. You can edit them under Pages > All Pages > Edit.
For more design control, use a page builder like Elementor, Divi, or SeedProd to design with drag-and-drop tools.
Step 7: Install Optional Plugins to Add More Features
WooCommerce is powerful on its own, but plugins let you add extra features and customize your store based on your needs. Here are some useful options:
- SEO Plugins: Plugins like Yoast SEO or Rank Math will help your products rank higher in search engines.
- Email Marketing: MailerHub makes email marketing simple, letting you create campaigns, manage subscribers, and track results without the hassle.
- Membership Management: MemberHub helps you manage memberships, control content access, and offer exclusive perks to loyal users.
- Sales & Discounts: Discountify lets you create special offers, limited-time discounts, and promo codes that keep people coming back.
- Product & Content Filtering: FilterPlus adds smart filtering options to your products, posts, or services, improving navigation and user experience.
- Checkout: Quicker lets you add single-click, multi-step, and other fast checkout options, making it easier for customers to complete their purchase.
- Cart Abandonment Recovery: WooCommerce Cart Abandonment Recovery helps recover lost sales by reminding customers.
- Customer Review: Customer Reviews for WooCommerce lets you collect and display reviews to build trust and boost sales.
- Analytics and Tracking: Try Conversios plugin. This eCommerce plugin helps you track store performance and customer behavior to make data-driven decisions.
Note: We have a comprehensive guide to must-have WooCommerce plugins. Be sure to check it out for more insights and recommendations.
Step 8: Secure, Optimize & Test Your Store Before Launch
Before you launch your WooCommerce store, double-check that it’s secure, optimized, and fully functional. Here is what you should do before going live:
Secure Your Store
- Install WordPress plugins like Wordfence or iThemes Security to protect against malware and more.
- Keep your WordPress website, and all of your themes and plugins updated to their latest version.
- Use strong passwords and two-factor authentication for admin accounts.
Optimize Performance
- Install a caching plugin (e.g., WP Rocket, W3 Total Cache) to speed up your site.
- Use an image optimization plugin like Smush or Imagify to reduce file sizes.
- Test your store’s loading speed with Google PageSpeed Insights or GTmetrix.
Test Store Functionality
- Place a test order with different payment methods to ensure checkout works properly.
- Test shipping rates, taxes, and coupons for accuracy.
- Check responsiveness (mobile, tablet, desktop).
- Verify all links, buttons, and forms are working.
Create a Backup Plan
- Install a backup plugin like UpdraftPlus or Jetpack Backup.
- Schedule regular backups so you can quickly restore your site if something goes wrong.
FAQs on Building an eCommerce Website with WordPress
- Can I sell services or digital products with WooCommerce?
Yes. While adding products, just mark products as “Virtual” or “Downloadable” to sell services or digital goods.
- How do I handle region-specific taxes like GST/VAT?
Go to WooCommerce > Settings > General and enable taxes. In the new Tax tab, you can add custom tax rates for different regions (like GST for Australia or VAT for Europe).
- Why to Build an eCommerce Site With WordPress?
Because it’s cost-effective, beginner-friendly, and highly customizable. With dozens of themes and plugins, you can create a store that fits your brand perfectly. Plus, WooCommerce gives you full control over products, payments, shipping, and more.
- Is WordPress secure for an online store?
Yes, WordPress is secure when managed properly. Keep WordPress, themes, and plugins updated to the latest versions. Always use SSL (HTTPS) for safe transactions. Choose a reliable hosting provider that prioritizes security.
- How much does it cost to build an e-commerce website with WordPress?
The cost depends on your setup. On average, you will spend $10–15 per year for a domain, $5–20 per month for hosting, and up to $200 for themes or plugins. Overall, starting costs are usually between $100 and $500+.
- Do I need coding skills to create an online store using WordPress?
No, you don’t need coding skills to create a WordPress eCommerce website. WooCommerce has necessary features to create a store without any coding. And you can always use plugins to extend default eCommerce functionalities.
- What’s the difference between WordPress and WooCommerce?
WordPress is a CMS for building websites, while WooCommerce is a WordPress plugin that adds eCommerce functionality.
- How can I optimize my WordPress eCommerce site for search engines (SEO)?
You can optimize your site by installing an SEO plugin like Yoast or Rank Math, writing clear product titles and descriptions, and adding alt text to images. Improve site speed with caching and image optimization, and build internal links between your pages.
- Can I build a mobile-friendly eCommerce website with WordPress?
Yes. Most WooCommerce-compatible themes are responsive, which means your store will adjust automatically for mobile, tablet, and desktop. You can also preview your site on different devices and make small tweaks if necessary.
- How long does it take to make an eCommerce website with WordPress?
A basic store can be set up in one or two days, especially if you use a ready-made theme. For a fully customized store with products, branding, and plugins, it may take one to two weeks.
Closing Thoughts
Now you know how to build an eCommerce website with WordPress and how easy the process is. The fact is right guidance will let anyone create a fully functional online store with ease.
Just follow step by step instructions, don’t compromise with quality hosting and relevant theme. Also, consider plugins like MemberHub and Discountify to extend your store’s default functionality.
Now it’s completely up to you.
Though we have shared everything you need to get started, the real magic happens when you take action. Start building, experiment, learn, and watch your vision come to life.
If you need any help with getting your site up and running, feel free to reach out in the comments below!


